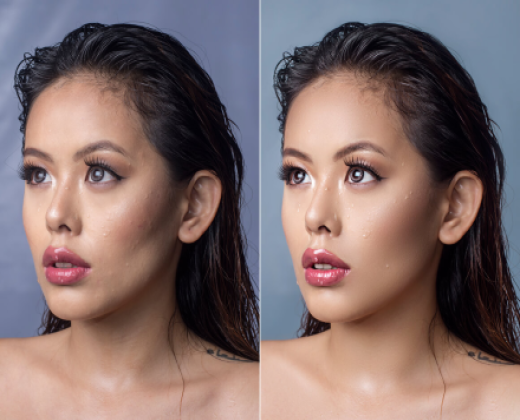


How to mask hair in Photoshop is not an easy task. It is time-consuming, and you may make several mistakes. However, once you master Photoshop masking technique, you are free to experiment with other masking techniques. This article will help you learn how to mask with Photoshop.
First of all, you need to open the picture in Photoshop to mask unwanted photos in Photoshop. To open the image, go to LENS select tool. There will be a picture in the Photoshop window with an arrow on the bottom right corner that says layer mask. Select the desired picture in layers and click on the open option.
With the different colors, you can create layers in layers. You can use the background image to create contrast. For example, if the left part of the hair is light in color and the right part is dark in color, you can do a photo masking with the contrast effect by selecting both of them with the Selection tool. Then you need to erase the selection if there is any.
Step 1 - Mask of hair in layers. After you have finished resizing the image, it is time for masking of hair. First, open a new layer. Then, use the feather tool to create a selection in the hair area. When you are about to move to the next step, place your mouse cursor where the area of the hair is as narrow as possible and move the mouse to the end of the hair.
Step 2 - Mask in one single stroke. To create masks in Photoshop, first of all, draw lines on your photo in many directions keeping in mind the width and height of your image. It would be best if you determined the masks you want to create. Now place your mouse cursor at the exact position you want to be in for the masking.
Step 3 - Mask of hair in Lightroom. After resizing your photo, you are ready to make masks. Open the adjustment layer of your Lightroom (click the name of your layer to see it.) Make the first mask as a replacement for your original photo. Select the Brush tool and make several selections inside the image. After that, place your mouse cursor where you would like to make the mask of hair.
Step 4- Refine edge While refining edge is not necessary, but it gives more defined masks. After making a selection, your cursor should be at the end of the selection you just made. Then click and hold the shift key when clicking your mouse on the mask hair. The adjustment layer of your Lightroom should be replaced with your original photo. If you don't like the result, you could use the Brush tool again to refine the edge.
These steps are not entirely necessary for photo editing. However, it will help you master Photoshop masking. Learning advanced Photoshop tricks like this will help you turn out great images that will wow your audience and potential clients.
Now that we have learned how to mask a photo, we should take a look at one more technique. The layer mask technique will allow you to make some fine adjustments within one image. To use the layer mask, go to the Layers Panel. Click on the layer mask button. You will then see two options: Brush and Mask.
The layer masking technique uses two colors - one for the background and one for your mask. Using the color for your background, desaturate your image until you have an appropriate contrast. Choose the gray-tinted option from the Image menu if your idea has no color effect. Then select a Brush from the toolbar to make your changes.
The masking technique is used in photo editing programs to remove the background image and create your image mask. It is an essential part of image masking because it allows you to make selective adjustments to highlights and shadows. There are many ways you can apply this selective adjustment to your image. We'll discuss a few of them now.
One way is to do it manually. Simply double click on the background and adjust its level to bring out highlights and the like. Another way is to do it automatically by pressing the TAB button on your keyboard. Finally, you can use the Smooth adjustment tool in Photoshop to do automatic image masking. This is very helpful if you need to make a quick correction to the hair or other aspects of the image, such as the eyebrows. These are just a few techniques to help you with masking.