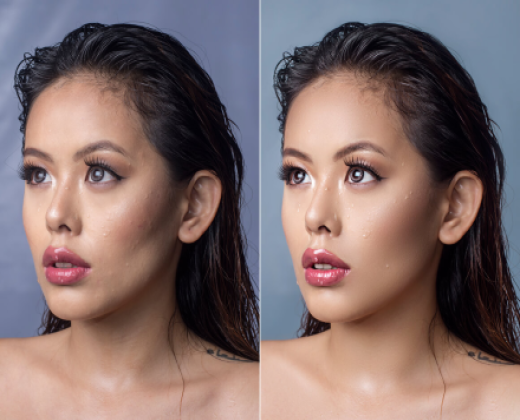


Photoshop color-correct product Photography is not that hard, but it does require some skill on your part. When doing Photoshop color changes, there are several reasons for needing to color change your photos.
One reason is that you may be using three or four different images in your image processing pipeline, all of them taking a photo at the same time. So, when you apply the Photoshop color change to one of these images and save it, you will get an incorrect color change, as your image processing software may interpret the values as being identical.
Photoshop has built-in tools for performing color corrections to images. One tool in particular that Photoshop users are well familiar with is the 'Color Correction tool. This tool is located in the primary color tool palette and can be found by clicking on the color square in the lower right-hand corner of your photo image gallery. This is the only way to perform a color correction. You cannot change the actual color of your photograph simply by adjusting the brightness and contrast, like this, which will change the overall appearance of the image. This tool is used mainly for correcting white balance errors and tone correction.
To make precise color adjustments, open a new Photoshop document and utilize tools like 'Selective Color', 'Match Color', or 'Replace Color'. These adjustments should be made with care to achieve the desired color accuracy.
If you need to make any color adjustments to your image after you have taken the picture, you should open a new Photoshop document and make an adjustment to your image. Click on the (select-adjustment-selective color), (select-adjustment-match color), and (select-adjustment-replace color) buttons at the top right-hand corner of your Photoshop window to bring up the color corrections dialog box. Choose the desired level that you want to make the color change, typically the value between white and gray. Once you have made the color change, save your image as a new file.
If your product photography involves any sort of workflow, then color correction is necessary. Even if your computer works perfectly, there is still a chance that your image processing software might misinterpret the data that it receives from the computer and save your image as a different color than what is actually expected. In order to prevent your Adobe color correction program from accidentally changing your image's color, you should store all images in a separate folder. It is also advisable to store color-corrected images separately from color-uncorrected images.
Correct color corrections can be performed using the spot color tool in photo editing programs, although it is more commonly used in Adobe Photoshop. The spot color tool allows you to quickly identify areas of color distortion in your photograph. You should use this tool when making color corrections to your photographs. If you are unable to identify any areas of color distortion in your images after making these corrections, then you should save your image and try again later.
Color corrections are also essential when editing stock photos that you may have taken using the digital camera. Sometimes you may find that the colors in the images are not quite what you expected. In this case, you should open your image processing software and use the image correction tool to correct the flaws. In Adobe Photoshop, you click on the "image layer" tab and choose the tool "level or curve." This tool will allow you to make corrections to your image that will make the image look like it was taken using a color film.
Color corrections are essential to enhancing the appearance of your photographs. If your images are not correctly colored, it could cause them to lose their sharpness and vibrancy. In addition, it could also cause your pictures to appear fuzzy or hazy. This could be very distracting to the viewer. You should try and experiment with the color level adjustment tools of Adobe Photoshop until you are able to make the image look as good as possible.
Another great tip that can help you with color corrections is to use the same image processing software program that you use for cropping and optimizing your images. When you have an image of a product, crop the image and adjust its brightness and contrast levels using the image processing software. Once you have done this, you can then make color adjustments to the image. These adjustments should be made on the image processing software's toolbar.